Category Archives: improving your photography

Improving your photography/advice from a pro

In this blog I will share with you some simple tips for you to improve your own picture taking.Photography is made up of light and composition,you need both elements to make a great photograph’ The photograph below has both,great composition, notice how I framed the cats eyes.framing is a law of composition and will definitely make your photos much more interesting

aaanrrsws43

http://www.creativefreedomphoto.com/

In the photograph below I purposely used the noon sun (a time you do not want to take portraits) I wanted the effect of shadow and depth.In this composition I filled the frame with the subject.

UP RISEING

http://www.creativefreedomphoto.com/

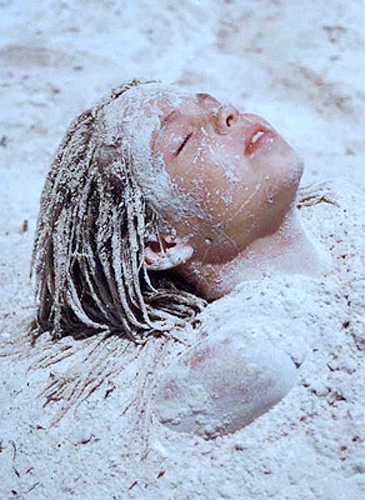
The best natural light for photographs is overcast,skin tones are even and colors pop.You cant always get what you want so if you are going out shooting in natural light,go in the”magic hour” first light of day and an hour before sunset when the sun is low in the sky.Below a great example of overcast and also “framing”

Featured Image -- 1021

http://www.creativefreedomphoto.com/

The photo below,”LEADING LINES” Another rule of composition,I rarely put my subject directly in the middle,when you have leading lines its O.K to do so.


The photo below/what makes this photograph great are a few things.the angle,shooting from above looking down,see how this also isolates the background.There is nothing more distracting to me in a photograph than clutter. The photo also tells a story,it says something not just a photo of the couple smiling and looking at the camera,it captures the love the joy between this just married couple.fws1-003

Photos below two thirds rule,see how in these photographs the subject is NOT directly in the middle


http://www.creativefreedomphoto.com/

n order to capture a clear silhouette, you’ll need the background to be brighter than your subject. The best way to do this is to shoot at the beginning or the end of the day. The optimum time to shoot a silhouette is when the sun is low in the sky – either when it is rising or setting. Sunsets are a favorite among photographers who regularly create spectacular silhouettes, but you can also shoot a decent silhouette against a blue sky.

Happy shooting! Practice makes perfect!


Improve your travel photography/advice from a photojournalist


My very favorite thing to photograph is travel/street photography. Especially when I see a place for the very first time.Being a “people” photographer No place on earth inspires me more than New Orleans.To me its the people that make the place!

1ws

 http://www.creativefreedomphoto.com/

  My best advice.:
1) use a lens that cane do both wide angel and zoom.Invest in a camera backpack,limit the amount of equipment. Its NOT the equipment that capture the moment,its you.
2) Do not walk around alone.
3) Be fearless,go off the beaten path.While visiting New Orleans I went to the ninth ward. There is a magical place  called “musicians Village” that is were I met David
4) DO NOT go on a guided tour
5) Talk to people,get up close and personal
6) Street musicians are a good place to start,they never mind if you are talking their photo.
7)Pay attention to detail
8) think outside of the box,try interesting views,different angels and perspectives
9 ) Go out with your camera in the magic hour right after the sun comes up,right before the sun sets.After the rain,photograph reflections in puddles,take advantage of overcast light,makes colors pop and skin tones, even. Twilight immediately after the sun sets for night scenes.
10)Try to stay in the center of town,I shot this one from my balcony at three in the morning.
wsrsts
11)Most of all, let the story unfold before you,enjoy the adventure.Its like when I photograph a wedding I dont think about it and put pressure on myself,the story unfolds before me, I am there to tell the story

“SEEING THE LIGHT” NATURAL LIGHT PHOTOGRAPHYhttp://www.creativefreedomphoto.com/

232ee5Photography is mainly made up of light and composition, you can have the greatest composition but without the right light…bla,or you have the most amazing light but with out a great composition,it will not be a great photograph

  I have been asked many times, how do you learn about light. My answer is go out there and shoot in every possible light.
  The two “magic hours, the first and last hour of light.
Back lighting is my favorite (makes things POP,look three dimensional)
a for thumt n re size-001
When your subject is in front of the sun silhouette)
NOON the WORST time of day for portraits deep shadows and texture,however
 if that is what you are going for like the photo below I wanted her to look as if she were rising out of the ground (I call it up rising) would NOT have worked at all in the “magic hr”
UP RISEING
 NOW my FAVORITE is overcast makes colors POP, skin tones perfect,so dont freak out if it rains on your wedding day chances are the light will be great for portraits.
amr
AFWS3-001
a1fbed
Rain, protect your gear but DO get out there or right after the rain, puddles and reflections make such interesting photos.
3ws
TWILIGHT, the 10 minuete window after sunset when the sky is not black yet and all the neon and available night light comes out,good to use a tripod at this time and perhaps a slow shutter speed.
a1ref2
Now get out there!!

PHOTOGRAPHY LESSON/VANTAGE POINT

by http://www.creativefreedomphoto.com/

One of the most common mistakes an amateur/novice photographer makes is to take the majority of their photos standing up with the camera held near chest or eye level. Although this is the most comfortable/natural orientation it’s not the one that is going to yield impressive or unique photos. Everybody else is doing it and if you’re interested in taking photos that are going to impress an audience outside of friends and family it’s time to get down & dirty, climb, contort & twist your body all over the place

1) Look Up / Look Down

As mentioned previously, taking photos from chest or eye level is what 90% of other photographers are already doing. Start noticing what’s going on up & down. You might notice a man shaving nearby an overhead window or a cute dog scurrying about at ground level. Try taking photos of somebody climbing up steep steps from an overhead perspective. The next time you take a portrait of somebody have them sit down and look up towards the sky or ceiling before taking their shot from an above perspective. Try capturing architecture or a statue from a close-up perspective pointing your camera upwards to capture a distinct or select element.

2) Climb a Mountain, ladder, tree or just some steps

One of the easiest ways to change your perspective is to shoot from a higher vantage point. In other words, be prepared to get physical and do a little exercise climbing a mountain, ladder, tree, or just some steps When shooting above and looking down it’s almost as if you have a bird’s eye perspective of what is going on below. From a higher vantage point you can take great shots of parades, crowds, traffic or scenic valley views. The rewards of doing this are that ‘many’ other photographers are simply too lazy to ‘climb’ something. This is a tip that can’t be underestimated: putting in a bit of grunt work

IMPROVING YOUR PHOTOGRAPHY “FRAMING” /by creativefreedomphoto

Framing is the technique of drawing attention to the subject of your image by blocking other parts of the image with something in the scene.

For this photograph I tore a hole in a leaf-in order to frame the couple

aa1fb-001

http://www.creativefreedomphoto.com/

The benefits of framing pictures include:

1. giving the photo context (for example framing a scene with an archway can tell you something about the place you are by the architecture of the archway or including some foliage in the foreground of a shot can convey a sense of being out in nature).

2. giving images a sense of depth and layers (in essence framing a shot generally puts something in the foreground which adds an extra dimension to the shot).

a1fbed

http://www.creativefreedomphoto.com/

3. leading the eye towards your main focal point (some ‘frames’ can draw your photo’s viewer into the picture just by their shape). Some also believe that a frame can not only draw the eye into a picture but that it keeps it there longer – giving a barrier between your subject and the outside of the shot.

 framed

http://www.creativefreedomphoto.com/

4. intriguing your viewer. Sometimes it’s what you can’t see in an image that draws you into it as much as (if not more than) what you can see in the picture. Clever framing that leaves those viewing your image wondering a little or imagining what is behind your frame can be quite effective (get it wrong and it can also be quite annoying!).

Frames for photographs come in all shapes and sizes and can include shooting through overhanging branches, shooting through windows, using tunnels, arches or doorways – you can even use people (for example shooting over shoulders or between heads) etc.Your frame doesn’t need to go completely around the edges of your image – they might just be on one or two edges of your shot.

bridsmaid walking

http://www.creativefreedomphoto.com/

My rule of thumb when considering framing is to ask the question – ‘will this add to or take away from the image?’ Sometimes framing can just add clutter to a shot and make it feel cramped – but at other times it can be the difference between an ordinary shot and a stunning one.

GO OUT THERE AND START FRAMING, challenge yourself see how many creative ways you can think of to frame your photographs

 little Louisiana girl

http://www.creativefreedomphoto.com/

ajb300

http://www.creativefreedomphoto.com/

Framing with color

This photo was captured at the Goombay festival in Key West

The photo below I wanted to find something to frame the beautiful eyes of this child

INNOCENT

http://www.creativefreedomphoto.com/


Improve your photography/rules of composition 2/by creativefreedomphoto

Portrait of Ivya Bat Man

http://www.creativefreedomphoto.com/

Unlike technical aspects of photography, artistic aspects cannot really be easily defined and applied to every photo. Probably the most important element of any photograph is its composition. The composition is what makes or breaks your photograph and yet not every composition rule will work well with every photo

FILLING THE FRAME

There’s an old adage in photography that says if you want to improve your photographs 100 percent, move closer. It’s true. The one sure way to keep from including too much extraneous information in a photograph is to fill the frame with your subject and nothing but your subject. Filling the frame from edge to edge leaves little doubt about what your intended target was. There are two ways to get closer: Use a telephoto lens or put some more wear on your walking shoes.

Fill the frame encourages you, as a photographer, to really spend some time thinking about your subject and how best to feature that subject in your photograph. How can you bring forward the details or the patterns or the most critical element(s) of your subject? How does the background add to or take away from the story that you are trying to tell?
 footloose and Fancy FreeGROWTH B SIOS

Background

This is one of those rules that almost all beginning photographers break. Sometimes we get so wrapped up in our subject that we don’t pay any attention to what’s going on behind them. If the background is busy and doesn’t add anything to your composition, try using a wider aperture so those distracting elements will become a non-descript blur. Or you can just try changing your angle.

Not all backgrounds need to be excluded, of course. Just make sure you pay attention to them and ask yourself whether they will contribute to or detract from your final image. Your answer will let you know whether you should get rid of them or include them. In the photo of the young just married couple walking on the beach, I included the old couple leaving the beach in the background for a reason,it does make the photograph more interesting. In the photograph of the little girl blowing bubbles, I used a swimming pool to isolate the background.

Asheville growth bubbles

http://www.creativefreedomphoto.com/

COLOR

Most people don’t conside rhow color can effect a photograph/make it POP.Know your complimentary colors! Colors that compliment each other, the opposite colors on a color wheel,remember the saying “Opposites attract”Blue and orange,yellow and purple,yellow and blue etc…

VANTAGE POINT

One of the most common mistakes an amateur/novice photographer makes is to take the majority of their photos standing up with the camera held near chest or eye level. Although this is the most comfortable/natural orientation it’s not the one that is going to yield impressive or unique photos. Everybody else is doing it and if you’re interested in taking photos that are going to impress an audience outside of friends and family it’s time to get down & dirty, climb, contort & twist your body all over the place

DSC_0064 1 a flower girl jj

http://www.creativefreedomphoto.com/

1) Look Up / Look Down

As mentioned previously, taking photos from chest or eye level is what 90% of other photographers are already doing. Start noticing what’s going on up & down. You might notice a man shaving nearby an overhead window or a cute dog scurrying about at ground level. Try taking photos of somebody climbing up steep steps from an overhead perspective. The next time you take a portrait of somebody have them sit down and look up towards the sky or ceiling before taking their shot from an above perspective. Try capturing architecture or a statue from a close-up perspective pointing your camera upwards to capture a distinct or select element.

2) Climb a Mountain, ladder, tree or just some steps

One of the easiest ways to change your perspective is to shoot from a higher vantage point. In other words, be prepared to get physical and do a little exercise climbing a mountain, ladder, tree, or just some steps When shooting above and looking down it’s almost as if you have a bird’s eye perspective of what is going on below. From a higher vantage point you can take great shots of parades, crowds, traffic or scenic valley views. The rewards of doing this are that ‘many’ other photographers are simply too lazy to ‘climb’ something. This is a tip that can’t be underestimated: putting in a bit of grunt work

…To show accomplishment, a child holding a trophy for instance,get down low and shoot up at your subject.